Create a Mobile app using Angular and Cordova
This will be a step by step guide for converting an angular project to an android application by using Cordova (The process will be quiet similar for creating IOS apps).

Before we start converting our application we need to install Cordova, Java SDK, Apache Ant, Gradle, and Android SDK for running our android application. If you have already done all the required setup you can skip this section.
Note: You don’t need to enter ‘$’ in front of every command, it indicates that you have to enter the command in your terminal.
Installing Cordova:
- You will need NPM(Node Package Manager) to install Cordova Package.
$ sudo apt-get update
$ sudo apt-get install curl
$ curl -sL https://deb.nodesource.com/setup_12.x | sudo -E bash -
$ sudo apt-get install nodejs
$ nodejs -v
$ sudo apt-get install npm
$ npm -v
2. You also need GIT, as it is used by Cordova behind the scenes.
$ sudo apt-get install git
$ git --version
3. Installing Cordova
$ sudo npm install -g cordova
$ cordova --version
Installing Java SDK:
You will need Java 8 (LTS version of Java) for running the latest version of Android SDK.
$ sudo apt-get install openjdk-8-jdk
$ java -version
Installing Ant:
Download Apache Ant zip file from here: ant.apache.org/bindownload.cgi then make a folder “ant” in your home directory and extract the downloaded zip file there.
Installing Gradle:
Apache Ant and Gradle are used behind the scenes by Cordova. You can simply install Gradle by entering
$ sudo apt-get install gradle
Installing Android SDK:
Go to the Android Studio website: https://developer.android.com/studio and scroll down till you see the “Command Line Tools” then download the appropriate zip for your OS. Make a folder “android” in your home directory and extract the zip file there.
Adding all the required Environment Paths:
After installing all the things you need to add their respective paths in the .bashrc file so that your application can access the required files throughout the system.
- Open the .bashrc file by typing
$ sudo gedit ~/.bashrc
2. Then add the following installation paths at the end of your .bashrc file. These paths may vary depending on where you have installed the required things and the version that you have installed. So make sure to put the correct path to the installation directory.
export JAVA_HOME=/usr/lib/jvm/java-8-openjdk-amd64
export PATH=$PATH:/usr/lib/jvm/java-8-openjdk-amd64/binexport ANT_HOME=~/ant/apache-ant-1.10.7
export PATH=$PATH:~/ant/apache-ant-1.10.7/binexport ANDROID_SDK_ROOT=~/android/sdk-tools-linux
export PATH=$PATH:~/android/android-sdk-linux/tools/bin
3. After adding the paths save and exit the .bashrc file. The changes will be visible after you log-out and log-in again into the system, or you can enter the following command:
$ source ~/.bashrc
Creating new AVD (Android Virtual Device) for running our app:
- View all packages
$ sdkmanager --list
2. Update installed packages
$ sdkmanager --update
3. Install build tools, required to build Cordova app
$ sdkmanager "build-tools;29.0.0"
4. Add any system image of your choice from the list of available packages
$ sdkmanager "system-images;android-28;google_apis_playstore;x86_64"
5. Create Android emulator
$ avdmanager create avd -n test -k "system-images;android-28;google_apis_playstore;x86_64" -g "google_apis_playstore"
6. List the created emulator
$ avdmanager list avd
After all the setup is done we are finally ready to start converting our Angular application to Cordova application. If you don’t have an existing Angular application go and create one (You can refer this: https://angular.io/docs)
- Navigate to your Angular project. For example purpose, I will be using a newly created Angular project.

2. Create a new Cordova project using
$ cordova create test com.example.test NewTest
3. Adding platform to the Cordova project. You can add a platform for IOS, Blackberry similarly.
$ cd test
$ cordova platform add android
4. Now we need to merge the Cordova project into the Angular project, so copy all the folders and files except for “package.json” and “package-lock.json” from the Cordova project to the Angular project.
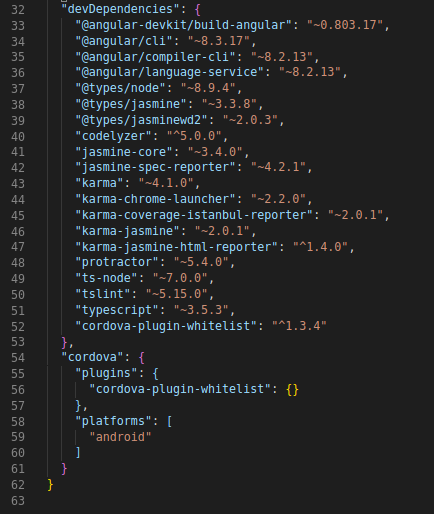
5. Then you also need to merge the package.json of both the projects, and the final package.json in the Angular project should look something like this.


6. Then open “src/index.html” file and change the <base href=”/”> to <base href=”./”>
7. Then open “angular.json” file and change the “outputPath” to “www”. So whenever you will build the Angular application the output will be generated in “www” folder. It is necessary as Cordova will generate its output by using the files which are inside “www” folder.
8. Then open “tsconfig.json” file and change the “target” to “es5”. Then your app can work in newer versions of Android too.
9. Finally, you can build your Angular project and then convert the output to a mobile app using Cordova.
$ ng build --prod --aot
$ cordova emulate android
10. When you enter the above command an emulator will pop up, with the app installed on it which you can test.

Congratulations, you have successfully created your first Cordova application. Now that you have followed along with this long tutorial, I have written a bonus section that will help you debug some of the common problems and customize your app with Cordova Plugins. If you have any doubt you can ask it in the comments section.
Adding Plugins to your Cordova App
- With Cordova Plugins you can access native functionality of mobile devices, such as mobile camera, geolocation, etc. You can checkout various available plugins on the Cordova docs here.
- For adding plugins in your Cordova app, you need to add the following line in “src/index.html” just before the closing tag of body
<script type="text/javascript" src="cordova.js"></script>
3. Eg. If you want to add device-plugin, then you will first install it like
$ cordova plugin add cordova-plugin-device
4. Then you declare it and use the plugin as mentioned in the docs
declare var device;
...
ngOnInit() {
    document.addEventListener(“deviceready”, function() {
        alert(device.platform);
    }, false);
}
Debugging the Cordova App through Chrome DevTools
If you get stuck somewhere, and you have no idea why the app is not working on the emulator. You can open chrome and type int the URL bar “chrome://inspect” which will open a page, then in the “Devices” section you can see your emulator listed. You can click “inspect” and debug it normally as you do with web apps.

Mobile App is not able to connect to a local server
If you have a local server running on your machine on “localhost”, and you try to connect to it from your app then you will not be able to connect. As when you will hit “localhost” from your app it will try to connect to its own “localhost” and it will not find any server running there. So to resolve this issue you need to run the server on your private IP address, which you can find by typing “ifconfig” in your terminal (“ipconfig” for windows). Then when you will hit the private IP address from your app, it will be able to connect to the server.
Mobile App is not able to connect to a remote server
If you are trying to connect to a remote server that is hosted somewhere, and your app is giving “ERR_CLEARTEXT_NOT_PERMITTED” error then put the following in your “config.xml” file.
- Inside the widget tag, add this
xmlns="http://www.w3.org/ns/widgets" xmlns:android="http://schemas.android.com/apk/res/android" xmlns:cdv="http://cordova.apache.org/ns/1.0"
2. Inside the platform tag (Of Android)
<platform name="android">
  <edit-config file="app/src/main/AndroidManifest.xml" mode="merge" target="/manifest/application">
    <application android:usesCleartextTraffic="true" />
  </edit-config>
</platform>
Getting an error due to the Min SDK version
Add this in your “config.xml” file, and change the value to whatever the required minimum value is.
<preference name="android-minSdkVersion" value="19" />


Comments
Post a Comment