Lets Generate a free SSL certificate and run an HTTPS server in 5 minutes or less (Node + Express + LetsEncrypt)
What you actually came for
First, you need those few things:
- A server running on a linux distribution with root access (via SSH)
- NodeJS: https://nodejs.org/en/
- Express :
npm install express - Certbot
To install certbot, copy-paste those lines in a terminal :
$ sudo add-apt-repository ppa:certbot/certbot
$ sudo apt-get update
$ sudo apt-get install certbot
Second, you will generate an SSL certificate with certbot :
$ certbot certonly --manual
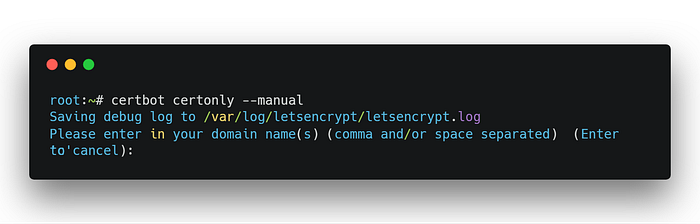
Type your domain name(s) without the protocol part. For instance: yourdomain.com or even muchdomain.verysite.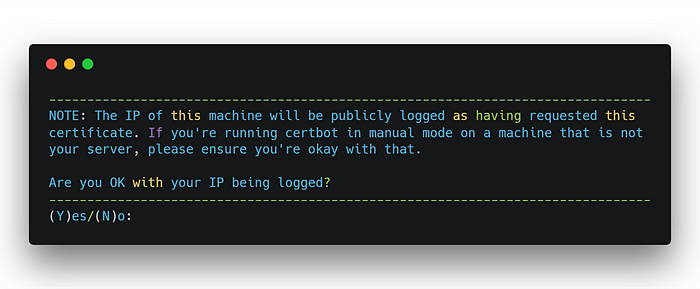
Type Y then ENTER.
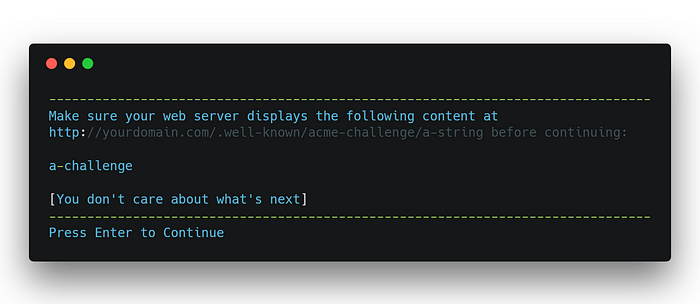
Note two things :
- a-string : The name of the file you have to create, right now. Just create it, we’ll take care of the directories later.
- a-challenge: Open the file you just created and put this challenge string into it. Nothing else, just this challenge string.
Now, don’t continue. You need to run a web server with Node & Express.
Keep your terminal opened somewhere
- Create a directory with the name you want, e.g : server
- In this directory, create a JS file which will run your server. Keep it empty for the moment as I’ll provide you with a ready-to-copy/paste source code.
- In this directory, create two directories :
.well-known, and inside this one, create :acme-challenge. - In the directory :
acme-challengeplace the file you created before : a-string
This is what you should have :
\server
----\.well-known
--------\acme-challenge
------------a-string
----server.js
Important: Actually the filename isn’t a-string, it is a long alphanumeric string. For security purposes I can’t show you mine. Same goes for a-challenge…
You’re almost done !
Use your favorite code editor and copy-paste this code :
To verify that everything is fine, open up your browser and navigate to : http://yourdomain.com/.well-known/acme-challenge/a-string
Your browser should download your challenge file. If it’s not the case, take everything back from the start. Don’t touch your shell, restart from directory & file creation.
If everything is okay, go back to your shell and type ENTER.
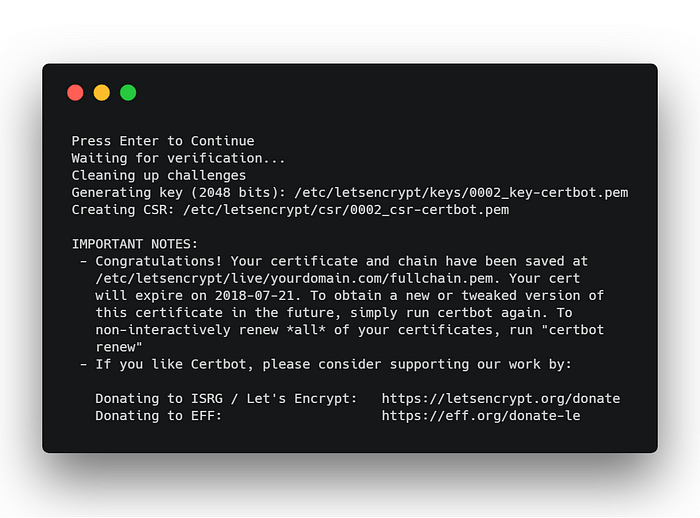
Copy-paste the following code and you’ll have a fresh HTTPS server running.
Navigate to : https://yourdomain.com, you should see “Hello there !”.
Well done, you’ve reached the end of this tutorial.
Last words:
- You might encounter errors, restart the tutorial from the beginning and overall don’t forget to modify yourdomain.com with your actual domain name. Same goes for a-string and a-challenge.
- If nothing works, let me apologize. StackOverflow will be your best friend.
- This tutorial aims to make you use the manual method so that you have control over almost everything. In my case, this is the only solution that has worked.


Comments
Post a Comment